Cabling for Installing Operating System
The OSN server can run on Linux™ or Microsoft Windows® operating systems. To install an operating system on your OSN server, follow the procedure below.
| ➢ | To install an operating system on the OSN server: |
| 1. | Disconnect the power cords from the power sources, and then remove the power cords from the power connections on the Power Supply modules. |
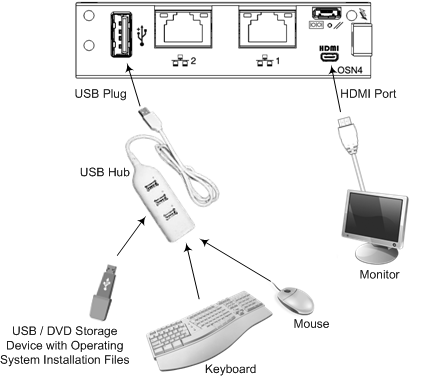
| 2. | Connect a USB hub to the USB port located on the OSN4 module, and then connect the USB hub to the following computer peripherals: |
| ● | Mouse |
| ● | Keyboard |
| ● | USB storage device containing the operating system installation files (disk-on-key or external CD-ROM or DVD-ROM drive) |
| 3. | Connect your monitor to the HDMI port on the OSN4 module, using a 19-pin micro-HDMI (type-D) male connector (see Cabling for Installing Operating System). |
Cabling OSN4 Module for Installing Operating System
| 4. | Reconnect the device to the power sources; the OSN server boots up from the USB storage device and the operating system installation begins. |
| 5. | Follow the online installation instructions to install the operating system. |
HDMI Type-D Connector Pinouts
|
Pin |
Signal |
|---|---|
|
3 |
TMDS Data2+ |
|
4 |
TMDS Data2 Shield |
|
5 |
TMDS Data2- |
|
6 |
TMDS Data1+ |
|
7 |
TMDS Data1 Shield |
|
8 |
TMDS Data1- |
|
9 |
TMDS Data0+ |
|
10 |
TMDS Data0 Shield |
|
11 |
TMDS Data0- |
|
12 |
TMDS Clock+ |
|
13 |
TMDS Clock Shield |
|
14 |
TMDS Clock- |
|
15 |
CEC |
|
2 |
Utility/HEAC+ |
|
17 |
SCL |
|
18 |
SDA |
|
16 |
DDC/CEC/HEAC Ground |
|
19 |
+5 V Power |
|
1 |
Hot Plug Detect/HEAC |